The Magic of UV DTF: Customizing Hard Goods Like Cups, Tumblers & More
You’ve seen how Direct to Film (DTF) can revolutionize fabric printing. But what if you could apply that same vibrant, detailed magic to hard surfaces? Imagine creating stunning, permanent designs on glass, metal, plastic, or wood—without needing a heat press.
Welcome to the world of UV Direct to Film (UV DTF). This groundbreaking technology lets you create high-quality, durable decals that can turn almost any object into a custom masterpiece. Let’s explore how it works and what you can create.
UV DTF opens up a new world of product customization.
What is UV DTF and How is it Different?
Think of UV DTF as creating a premium, permanent sticker. The process involves printing a design with special UV-curable inks and a layer of varnish onto a film. The result is a ready-to-apply transfer that adheres strongly to non-porous surfaces.
The key difference from standard DTF is right in the name: UV (ultraviolet) light is used to cure the ink, and no heat press is required for application.
- Standard DTF: Uses textile inks & a heat press. Made for fabrics.
- UV DTF: Uses UV-cured inks & is applied by hand. Made for hard, non-porous surfaces.
Why You’ll Love UV DTF
UV DTF isn’t just a sticker. It’s a professional-grade solution with some incredible benefits:
- 💪 Permanent & Durable: The UV-cured ink is waterproof, scratch-resistant, and won’t peel, making it perfect for items that are handled frequently, like tumblers and phone cases.
- ✨ Stunning Finish: UV DTF prints have a high-end, glossy finish that looks like it was printed directly onto the object. The varnish layer can even create a cool, 3D embossed effect.
- 🚫 No Equipment Needed: This is a huge advantage. You don’t need a heat press or any special machinery. Application is as simple as peel, stick, and rub.
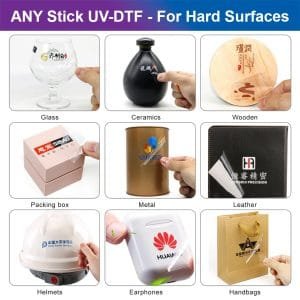
- 🎨 Limitless Possibilities: If it’s a hard, smooth surface, you can probably apply a UV DTF transfer to it. This unlocks a massive new range of products you can create and sell.
How to Apply a UV DTF Transfer
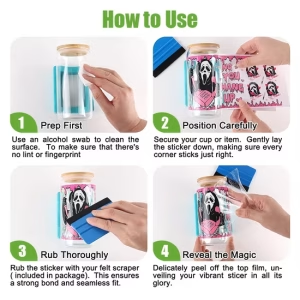
A Simple 4-Step Process:
- Prep: Clean the surface of your object thoroughly with alcohol to remove any dust or oils. Let it dry completely.
- Place: Peel the white paper backing from the transfer. Carefully position the sticky design onto your object, making sure it’s straight.
- Press: Using your fingers or a squeegee, rub firmly over the entire design. This ensures the adhesive bonds strongly to the surface.
- Peel: Slowly and carefully peel away the clear carrier film on top. The design will remain perfectly transferred. For best results, let the item sit for 24 hours before use.
Ready to Customize Everything?
Expand your creative horizons beyond apparel. Explore our vibrant UV DTF transfers and start creating premium custom goods today!